
REST Webservice
Let us try and understand REST web service. More than a decade after its introduction, REST has become one of the most important technologies for Web applications. Its importance is likely to continue growing quickly as all technologies move towards an API orientation. Every major development language now includes frameworks for building RESTful Web services. As such, it is important for Web developers and architects to have a clear understanding of REST and RESTful services. This tutorial explains REST architecturally, then dives into the details of using it for common API-based tasks.
While REST stands for Representational State Transfer, which is an architectural style for networked hypermedia applications, it is primarily used to build Web services that are lightweight, maintainable, and scalable. A service based on REST is called a RESTful service. REST is not dependent on any protocol, but almost every RESTful service uses HTTP as its underlying protocol.
Every system uses resources. These resources can be pictures, video files, Web pages, business information, or anything that can be represented in a computer-based system. The purpose of a service is to provide a window to its clients so that they can access these resources. Service architects and developers want this service to be easy to implement, maintainable, extensible, and scalable. A RESTful design promises that and more. In general, RESTful services should have following properties and features
REST uses HTTP methods explicitly and in a way that’s consistent with the protocol definition. This basic REST design principle establishes a one-to-one mapping between create, read, update, and delete (CRUD) operations and HTTP methods. According to this mapping:
To create a resource on the server, use POST.
To retrieve a resource, use GET.
To change the state of a resource or to update it, use PUT.
To remove or delete a resource, use DELETE.
A REST Web service application (or client) includes within the HTTP headers and body of a request all of the parameters, context, and data needed by the server-side component to generate a response. Statelessness in this sense improves Web service performance and simplifies the design and implementation of server-side components because the absence of state on the server removes the need to synchronize session data with an external application. REST webservice expose directory structure-like URIs. The request and response message structure of REST webservice which is HTTP based as shown below
HTTP Response Message Format

HTTP Request Message Format

Before we start with RESTful integration Let us discuss something about SOAP lookup and how to do it in PI 7.4.
Soap Lookup in SAP PI
Sending SOAP (Simple object access protocol) message request to a Webservice and receive response by calling a SOAP Channel in Java code is what is termed as SOAP Lookup. This channel can be part of an ICO. In case of integration with Salesforce.com the SOAP lookup becomes essential.
To access an object in SFDC there are two steps to be followed
- Establish Login Session with SFDC and get session ID in return
- With session ID request access to Salesforce object.
Here is the flowchart of the flow of request

For troubleshooting related to SOAP fault please refer to this blog
Need to create session with salesforce.com and can be created using a SOAP lookup.
This can be achieved through java mapping or an UDF (user defined function). Let me use an UDF for simplicity.
public String CreateSFDCSEssion(String Channel, String Receiver, String UserName, String Password, Container container) throws StreamTransformationException{ { String Sessionid = " "; //look up a channel Channel channel = LookupService.getChannel(Receiver,Channel); //Get the channel accessor SystemAccessor accessor = LookupService.getSystemAccessor(channel); //send SOAP session request with user name and password String SOAPxml =""+UserName+ " "+Password+"
The payload for sending log-in request is to be created in UDF. Let me illustrate the process of creating the request payload for login request.
You need to get the enterprise WSDL from SFDC administrator. Put this WSDL in SOAPUI tool.
You should be seeing a “login” request in SOAP request format as xml.
This serves as request XML in the UDF shown above.
Then you need to create an Integrated configuration(ICO) with dummy Sender and receiver components . The scenario should be SOAP to SOAP. The receiver channel used in this ICO should be the one used for lookup.
Here is the channel you need to create

In the target url of the channel use the SFDC url you get in the wsdl itself. You can see the URL in element “soap:address” appearing in WSDL. You can see I have used SOAP action as “login”.
You need to go to module tab to include a standard module to do transformation of payload from text to xml.

You can also refer to this blog for more details on the SOAP lookup.
This look up must be used in request mapping in the scenario. This SOAP Lookup works in UDF of the mapping. Now you need to send the GET/POST request to SFDC. For this first ask for the REST API developer guide from SFDC team. The REST request might be different depending on the object you are trying to access. Here is a sample developer guide you can use
From the SFDc team you will get some sample request as shown below
curl https://yourInstance.salesforce.com/services/data/v20.0/sobjects/Account/ -H
“Authorization: Bearer token”
Let me break this into parts
Target URL -> https://yourInstance.salesforce.com/services/data/v20.0/sobjects/Account/
HTTP Authetication -> “Bearer SessionID” here the session ID is the one you obtained via SOAP look up.
If you can send a REST request to SFDC , you can expect a JSON response from SFDC like this
{
“objectDescribe” :
{
“name” : “Account”,
“updateable” : true,
“label” : “Account”,
“keyPrefix” : “001”,
…
“replicateable” : true,
“retrieveable” : true,
“undeletable” : true,
“triggerable” : true
},
“recentItems” :
[
{
“attributes” :
{
“type” : “Account”,
“url” : “/services/data/v20.0/sobjects/Account/001D000000INjVeIAL”
},
“Id” : “001D000000INjVeIAL”,
“Name” : “asdasdasd”
},
…
]
}
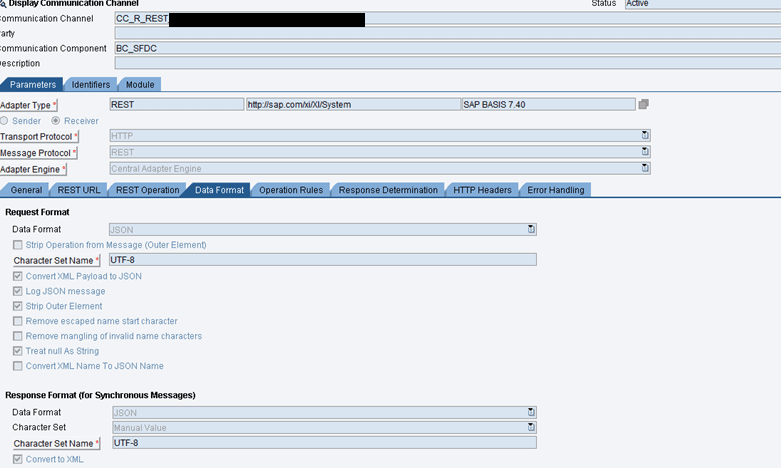
In the scenario, you need a REST receiver channel to do the communication with SFDC and convert the JSON response into xml. The HTTP Authentication part should be sent as part of REST header parameter to the REST channel. To put any parameter as part of REST header you need a small UDF which takes in as input the Session ID obtained after SOAP lookup. Here is the UDF
public String SetPatternVariable(String var1, Container container) throws StreamTransformationException{ DynamicConfiguration conf = (DynamicConfiguration)container.getTransformationParameters().get(StreamTransformationConstants.DYNAMIC_CONFIGURATION); DynamicConfigurationKey key = DynamicConfigurationKey.create("https://sap.com/xi/XI/System/REST","mode"); conf.put(key, var1); return ""; }
Now let us see the REST receiver channel configuration. In REST URL part define the URL provided by sfdc team. Secondly you need to use the pattern variable set up by above UDF. Here is the way you need to fill the values
Value source: Adapter specific attribute
Pattren element name: AuthorizationTokenForSFDC
Adapter specific attribute : Custom attribute
Attribute name:- mode
Here is the configuration of receiver REST channel.


In the HTTP Headers part “AuthrizationTokenForSFDC” is replaced by SessionID value obtained in SOAP lookup. The HTTP header setting needs to be followed as shown above.
Thus you need two ICO’s. One used for SOAP lookup and another for actually making REST webservice call to SFDC. In the second ICO create the request to SFDC as per format provided by salesforce team. In the request mapping include both the UDF’s described above in request mapping.
This completes the configuration to integrate PI with SFDC using SAP REST adapter.
Block diagram of the entire flow.

New NetWeaver Information at SAP.com
Very Helpfull