
Maximize & Minimize Panel Container in Lumira Designer / Design Studio
Hello,
My name is Ahmad Abdelrahim, senior developer & designer. I’ve been working on Design Studio since its first release (1.0). I’ve been developing dashboards using different languages/tools (Flex, .Net… etc.). I was happy when SAP introduced SAP Dashboards (formerly Xcelsius) because there’s no coding – only component configuration. Even though; Xcelsius has some limitations (mobile compatibility) but SAP Design Studio (and now Lumira Designer) addressed this issue and it enable us to do “minimal” coding.
Over the years, many of my coworkers come to me and ask “How we can enable minimize and maximize to containers (panel) in Design Studio?” Because this is a frequent request; I did some search on the web and in SAP blogs/community; but could not find direct simple answer; therefore; I used debugging skills to come up with a solution which has been tested and it’s working just fine.
In this blog post, I’m documenting the steps I followed to enable minimize/maximize panel container in “Design Studio/Lumira Designer”. This solution is not rocket-science, but hopefully would save some time for you. I also added the sample code as text so you can copy & past into your dashboard.
Applies to:
SAP Design Studio 1.x / SAP Lumira Designer 2.x version.
Summary:
This blog gives a detailed on how to implement minimize and maximize panel container in SAP Design Studio /SAP Lumira Designer.
Created on: Nov 12 2017.
Prerequisites:
SAP BusinessObjects Design Studio version should be on 1.x or higher / SAP Lumira Designer 2.x or higher. Basic knowledge of debugging skills & CSS.
Backgorund:
Adding “minimize & maximize” functionality is NOT available (out-of-the-box) in Lumira Designer / Design Studio; this method (enabling minimzie/maximize) requires basic knowledge of any browser debugger (Chrome/IE). This step is needed to identify the ID of the containers (which are generated at runtime).
Note: The following steps will show you how to add the functionality of minimize/maximize into a dashboard from scratch. If you need to replicate the functionality from this dashboard into another one, you can copy the created components/functions from an existing dashboard and past them into the new dashboard. You may need to fix the positioning and the script as needed.
Step by Step Procedure:
- Add the required icon(s) into your dashboard and lay them out based on UX/UI Design Guidelines. For this example; we will add an icons (to maximize and minimize panel containers). We will use one of the SAP icons that comes with design studio ( “sap-icon://exit-full-screen”)
- Position the icon and set the following two classes (“icon_style rotate180”) into CSS Class property. The first class (‘icon_style’) will set the color of the icon and removes the outline (the dashed line displayed when you click on the icon). The second class (‘rotate180’) will enforce the icon to be rotate 180 deg from its default so the dark arrow / pointer is pointing out (to set default state).
- When maximizing the panel, we will rotate the “same” icon so the dark arrow / pointer is pointing inside. This can be achieved by applying the style “rotate0” on the CSS Class of the clicked icon.
- Both classes (“icon_style” & “rotate0”) should be added into the Custom CSS referenced by the app.

![]()
-
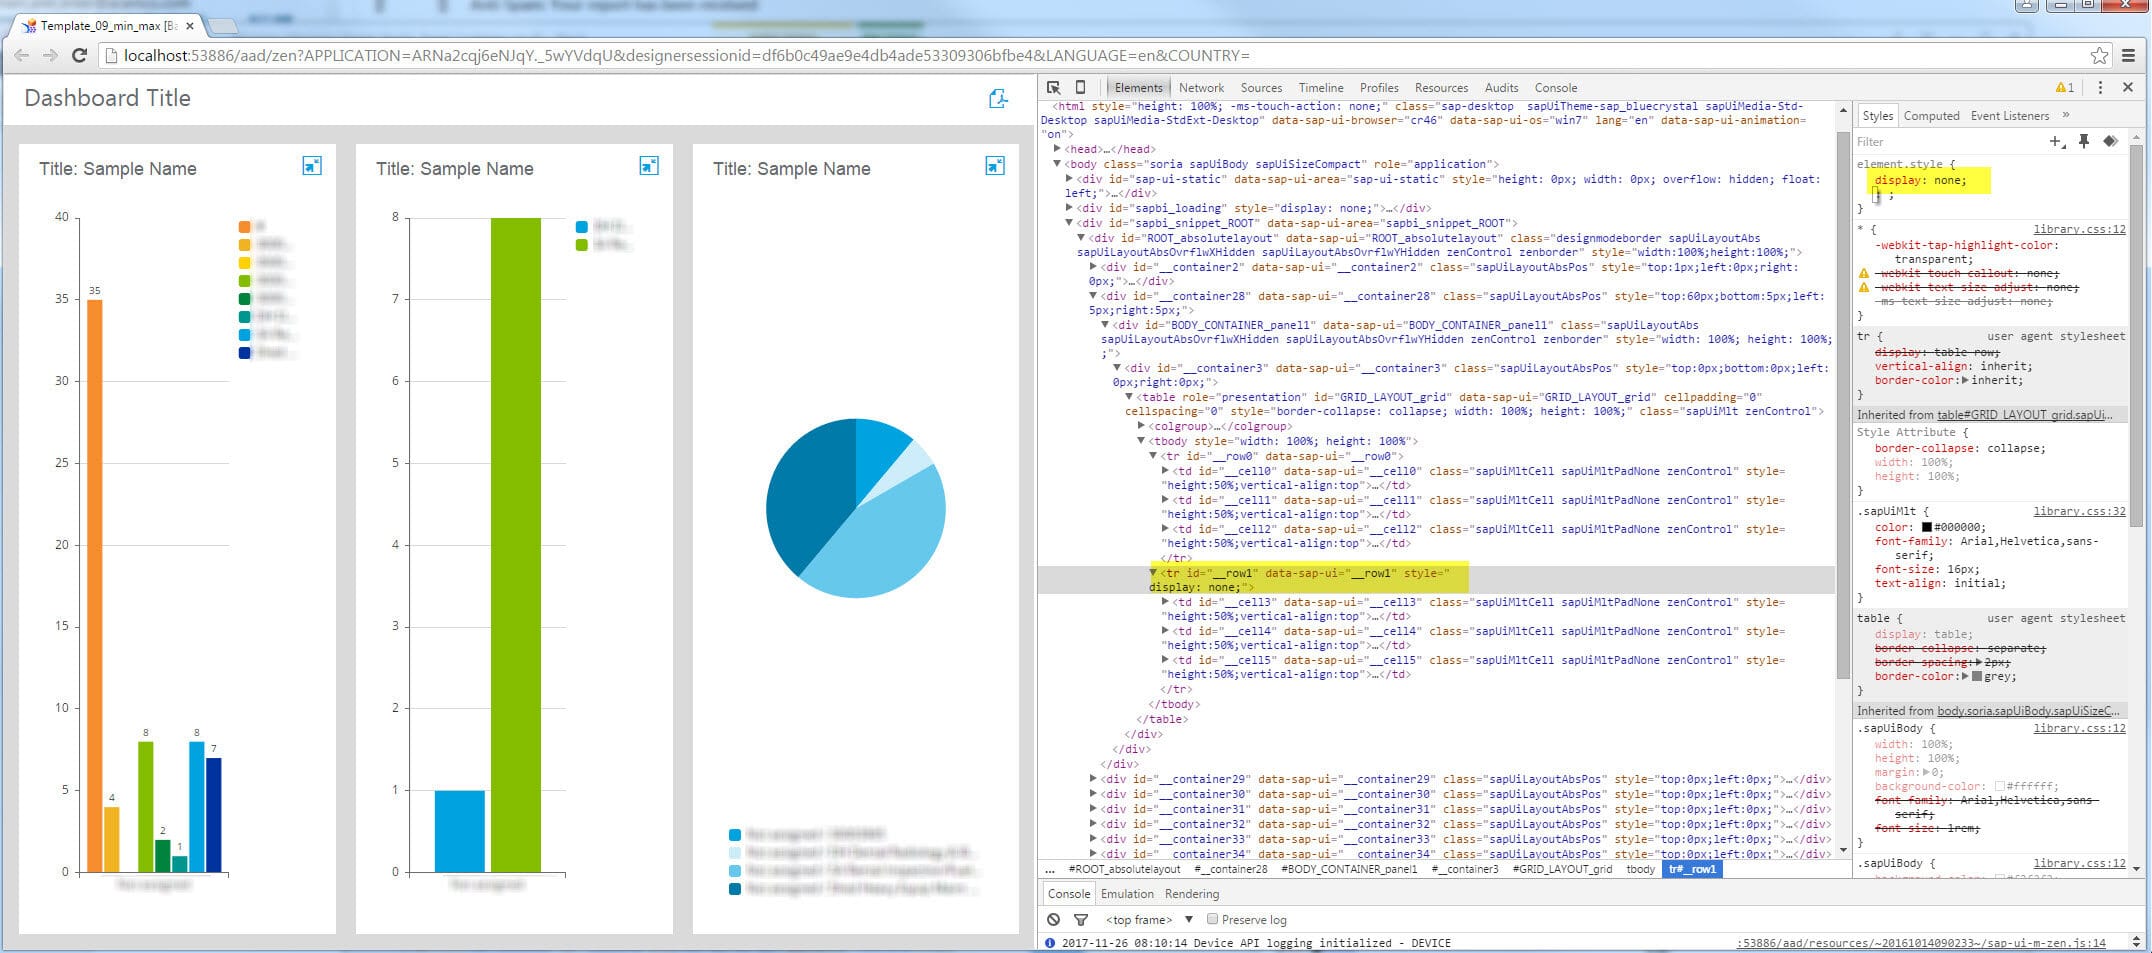
It’s important to understand that Design Studio converts your “Grid” components into HTML table. So, if you have grid with two rows and three columns, it will be converted into HTML Table with two rows and three columns.

-
The generated HTML code looks like the following:
__row0”>
__row1”>
__cell1”>… __cell2”>… __cell3”>… __cell4”>… __cell5”>… __cell6”>… ![]()

-
In CSS, we can hide section (along with its contents) by setting the property “Display” to “none”. To verify that we have selected the correct section/tag, select one of the rows
(ex.Display: none;
as a result, you will see that the row id “__row1” disappeared. Same thing will happen if we set the property for the other rows/columns.
![]()
- Based on the above, we will define a new CSS class that will hide the identified row by setting the property “display: none”. Note that the grid_layout has NO CSS Class by default.

- When the user clicks on the maximize icon (of the chart), we need to do the following:
- Identify the trigger; which can be a parameter passed into the function.
- Identify the state of the container (maximized or minimized), this can be achieve by checking the class that is applied against the default (“icon_style rotate0”)If the class is not the default one; this means that it’s already maximized so we can toggle between the two states.
- Same approach is done for the other rows/columns/containers.
-
Add the following classes into your custom CSS:
.__row0 #__row0 { display: none;
}
.__cell0 #__cell0 { display: none;
}
.__cell1 #__cell1 { display: none;
}
.__cell2 #__cell2 { display: none;
}
.__row1 #__row1 { display: none;
}
.__cell3 #__cell3 { display: none;
}
.__cell4 #__cell4 { display: none;
}
.__cell5 #__cell5 { display: none;
}
![]()
- To apply simple FadeIn/FadeOut effect when toggling between minimize and maximize state, add the following classes into your custom CSS:
.fadeIn {
-webkit-animation-name: fadeIn;animation-name: fadeIn; -webkit-animation-duration: 2s; animation-duration: 2s; -webkit-animation-fill-mode: both; animation-fill-mode: both;
}
@-webkit-keyframes fadeIn {0% {opacity: 0;} 100% {opacity: 1;}
}
@keyframes fadeIn {0% {opacity: 0;} 100% {opacity: 1;}
}

.fadeOut {
-webkit-animation-name: fadeOut;animation-name: fadeOut; -webkit-animation-duration: 2s; animation-duration: 2s; -webkit-animation-fill-mode: both; animation-fill-mode: both;
}
@-webkit-keyframes fadeOut {0% {opacity: 0;} 100% {opacity: 1;}
}
@keyframes fadeOut {0% {opacity: 0;} 100% {opacity: 1;}
}
![]()
- Right click and select “Create Script Function” and name your function
(Ex. “minimize_maximize_panels_handler”)
![]()
- Edit the script function (“minimize_maximize_panels_handler”) and add a parameter (ex. panel_id) which is used to identify the icon(s) that triggers the action and add the following code to handle user selection:

// Panel ID #1
if (panel_id == 1) {
if (MIN_MAX_ICON_1.getCSSClass() == “icon_style rotate180”) {
GRID_LAYOUT.setCSSClass(“__cell1 __cell2 __row1 fadeIn”); MIN_MAX_ICON_1.setCSSClass(“icon_style rotate0”);
}
else
{
GRID_LAYOUT.setCSSClass(“fadeOut”); MIN_MAX_ICON_1.setCSSClass(“icon_style rotate180”);} }
// Panel ID #2
if (panel_id == 2) {
if (MIN_MAX_ICON_2.getCSSClass() == “icon_style rotate180”) {
GRID_LAYOUT.setCSSClass(“__cell0 __cell2 __row1 fadeIn”); MIN_MAX_ICON_2.setCSSClass(“icon_style rotate0”);
}
else
{
GRID_LAYOUT.setCSSClass(“fadeOut”); MIN_MAX_ICON_2.setCSSClass(“icon_style rotate180”);} }
// Panel ID #3 if (panel_id == 3) {
if (MIN_MAX_ICON_3.getCSSClass() == “icon_style rotate180”) {
GRID_LAYOUT.setCSSClass(“__cell0 __cell1 __row1 fadeIn”);
MIN_MAX_ICON_2.setCSSClass(“icon_style rotate0”);
}
else
{
GRID_LAYOUT.setCSSClass(“fadeOut”);MIN_MAX_ICON_2.setCSSClass(“icon_style rotate180”);
} }
// Panel ID #4
if (panel_id == 4) {
if (MIN_MAX_ICON_4.getCSSClass() == “icon_style rotate180”) {
GRID_LAYOUT.setCSSClass(“__cell4 __cell5 __row0 fadeIn”); MIN_MAX_ICON_4.setCSSClass(“icon_style rotate0”);
}
else
{
GRID_LAYOUT.setCSSClass(“fadeOut”); MIN_MAX_ICON_4.setCSSClass(“icon_style rotate180”);} }
// Panel ID #5
if (panel_id == 5) {
if (MIN_MAX_ICON_5.getCSSClass() == “icon_style rotate180”) {
GRID_LAYOUT.setCSSClass(“__cell3 __cell5 __row0 fadeIn”); MIN_MAX_ICON_5.setCSSClass(“icon_style rotate0”);
}
else
{
GRID_LAYOUT.setCSSClass(“fadeOut”); MIN_MAX_ICON_5.setCSSClass(“icon_style rotate180”);} }
// Panel ID #6if (panel_id == 6) {if (MIN_MAX_ICON_6.getCSSClass() == “icon_style rotate180”) { GRID_LAYOUT.setCSSClass(“__cell3 __cell4 __row0 fadeIn”); MIN_MAX_ICON_6.setCSSClass(“icon_style rotate0”);
}
else
{
GRID_LAYOUT.setCSSClass(“fadeOut”); MIN_MAX_ICON_6.setCSSClass(“icon_style rotate180”);} }
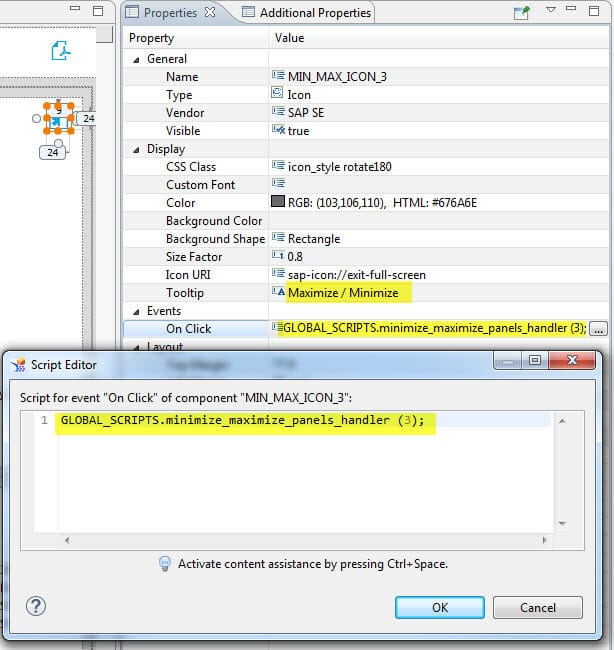
- Now, we need to trigger the action (minimize/maximize) by calling the function “minimize_maximize_panels_handler” and passing the required parameter when the user clicks on the icon of desired container.
- Select the icon that will trigger the action and click on “…” (next to “Events – On Click”)
Add the following script which will toggle between maximize and minimize of the clicked icon. GLOBAL_SCRIPTS.minimize_maximize_panels_handler (1); // (1 = panel id)
Do the same thing for the other icons… call the same function and pass different parameter (1, 2, 3, 4, 5, 6).![]()
Note that the same icon is used to maximize and minimize, but when we rotate the icon 180 degree so the diagonal arrow is pointing away or inside

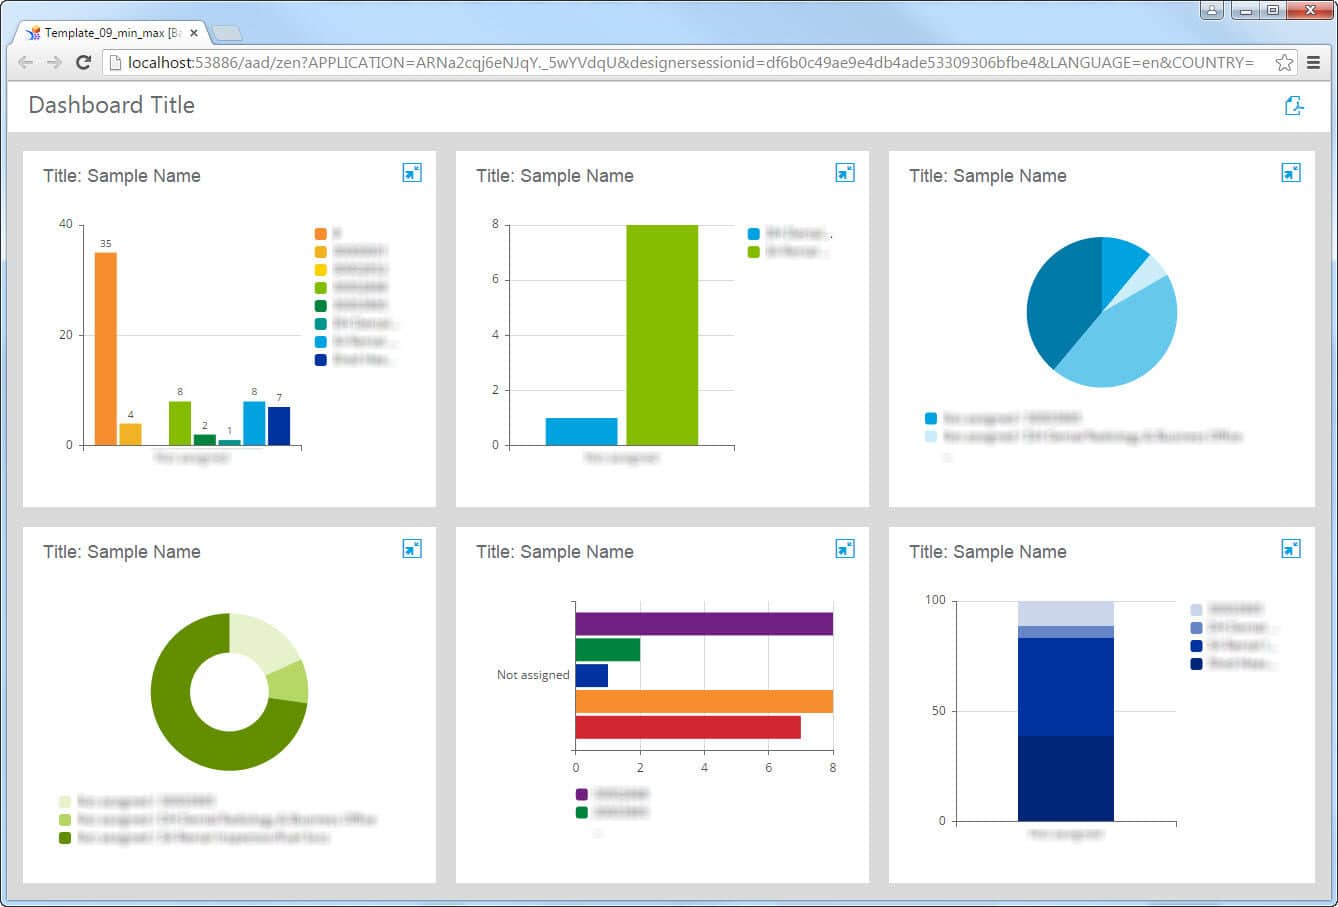
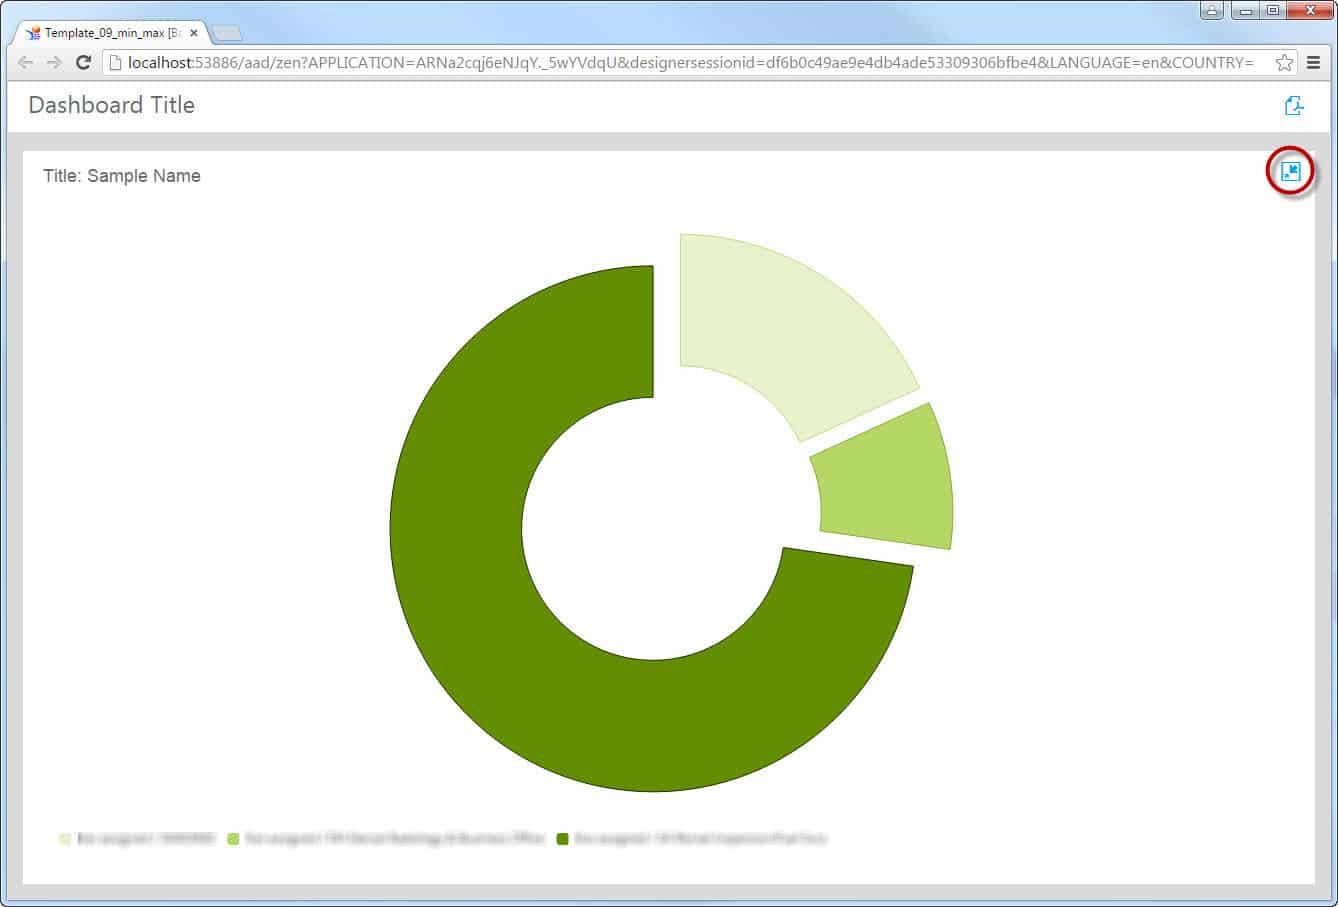
- Save your project and test the functionality of minimize and maximize desired panel.
![]()

![]()


— The End —
New NetWeaver Information at SAP.com
Very Helpfull