Maps Side Panel for SAP Business Client with Openstreetmap and SAPUI5 Geo Map
I have started to build a Side Panel for the SAP Business Client with SAPUI5 and integrated Google Maps for myself and for Testing these Technologies interact. I placed this Sidepanel within Transaction BP to visualize the adresses of business partners.
Already there I found out that there was no real tutorial how to do that. But with Google Maps it was pretty easy.
So the Google Maps Side Panel worked and our Consultants have heared about it and wanted to use this on production.
I decided to use the Geo Maps Component of SAPUI5 and the Tiles from Openstreetmap to implement this requirement, because the use of the Google Maps API is questionable due to usage issues.
In this tutorial I will explain how I have implemented this requirement
1. Tagging Implementation
Before we start we have to make sure that the tagging works and will pass the tags that we need to the Sidepanel in NWBC.
So for our needs we need the Street, House Number, Postal Code and the City. Maybe u have already the right tagging(maxbe with other names). Then you could go to the next step.
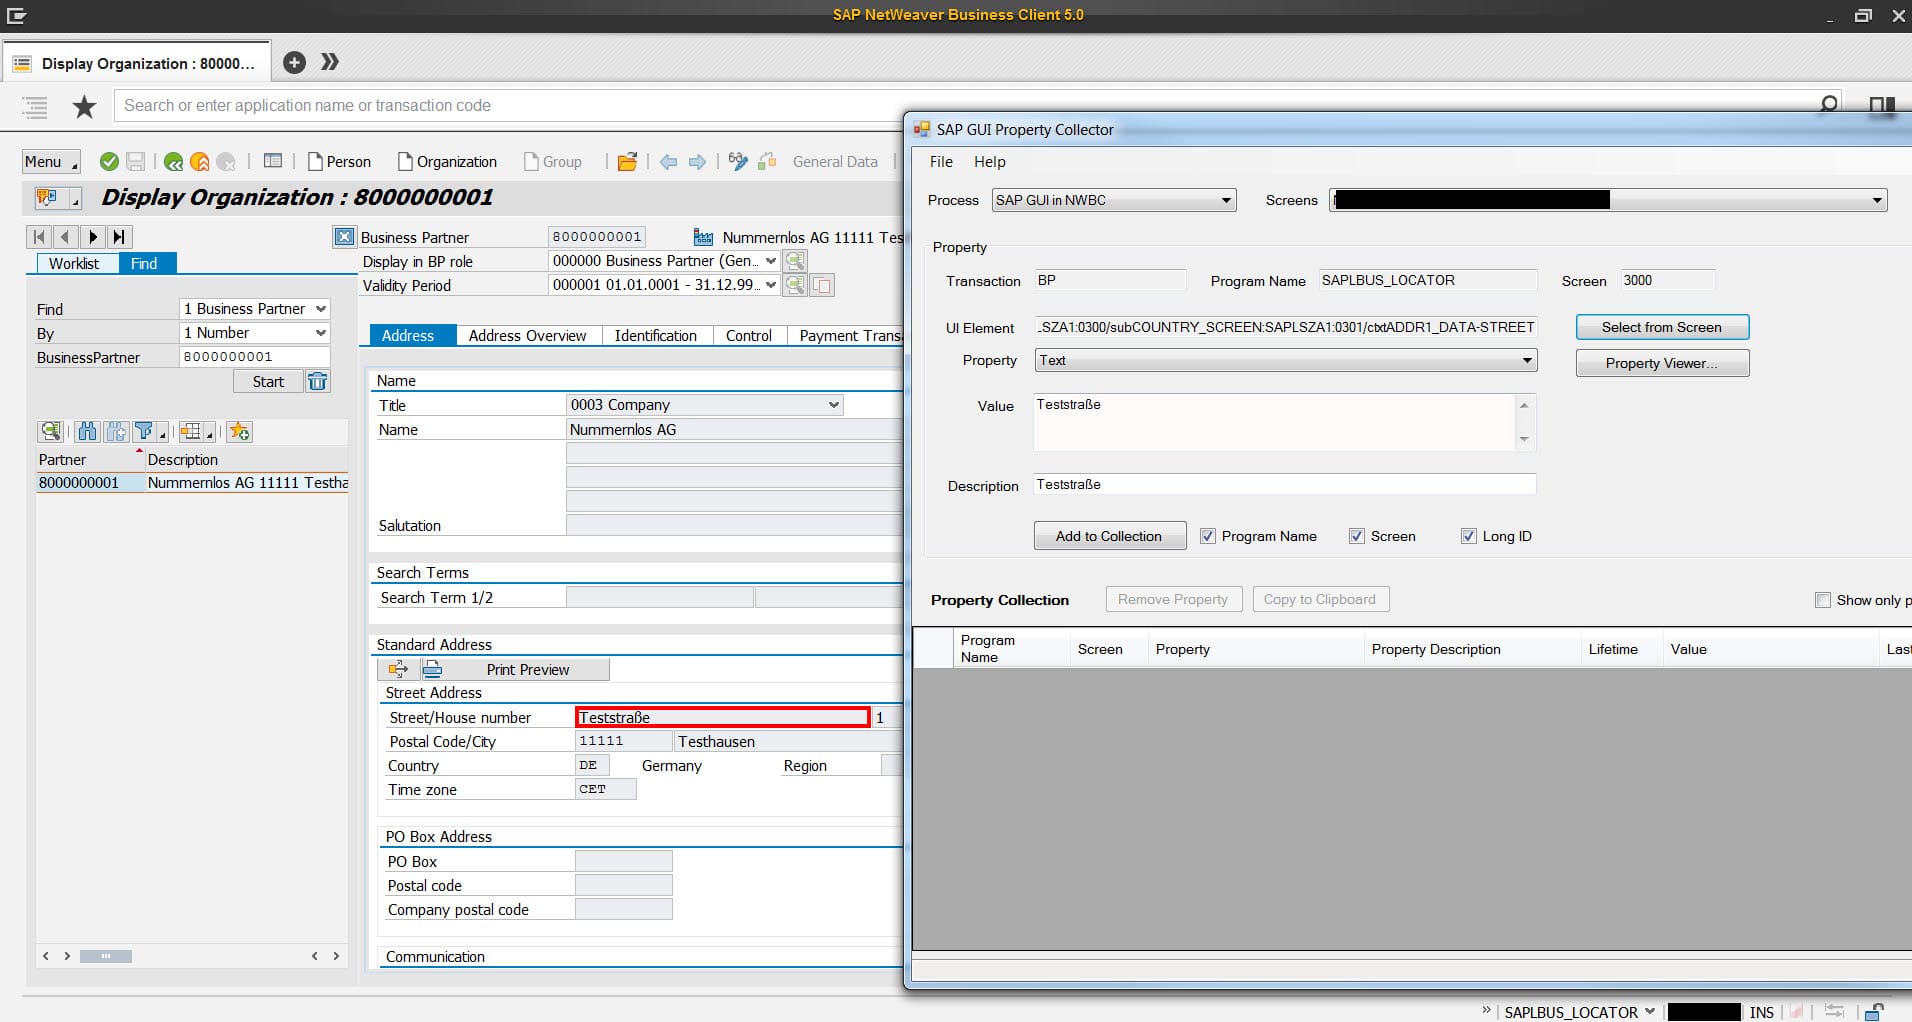
Starting SAP GUI Property Collector after you started transaction BP:
Click on NWBC Menu and hold the STRG-Key
Help>Tools>SAP Gui Property Collector
Then we have to click on Select from Screen and have to hold down the left mouse button and move to the field you want to send as tag to the Side Panel.

After that you have to click on Add to Collection

Now you could mark this entry and click on the Copy to Clipboard button above.
You can decide if you want to customize the tagging for one client or if u want to use the tags system-wide. I decided to use the tags system-wide so i added the copied entry to the table NWBC_VS_GUI_TAG.

Then you have to save you entry.
You have to do that for all tags i mentioned before and restart the NWBC. Then you should view the passed tags in the Data Context. (NWBC Menu with STRG-Key then Help>Tools>Side Panel>Data Context AppData Viewer)

Further infomation about the tagging implementation
3. The SAPUI5 Application for our Side Panel
Now we have the tagging. But the interesting point is how to build an SAPUI5-Application in the Side Panel, that could work with these tags we passed before and use these information to show the locations of the business partners on the map.
So let’s start Eclipse ????
There you have must create a new SAPUI5 project. We work with target device mobile(lib: sap.m) and with XML as development paradigm.
So the index.html is fully created by Eclipse, you only have to insert a few more librarys to use the Geo Map Component.
index.html
Slowly it becomes a bit more interesting if we start to implement the View for this Application:
view1.view.xml
Here we put the Geo Map Component on the Page and say that it should use the full width and height. Next we also need a Spot, to see, where the Business Partner is exactely located at. The key is, that we bind this spot to a model, so that we can set this spot dynamically from the model we set on the controller.
The last but also biggest thing we need to implement is the controller with the programm logic.
view1.controller.js
sap.ui.controller("sidepanel_bp_maps.view1", { onInit: function () { var startadress = "Baden+Württemberg"; var lat; var lon; window.oGeoMap = this.getView().byId("GeoMap"); window.oMapConfig = { "MapProvider": [{ "name": "Openstreetmap", "copyright": "© openstreetmap", "Source": [{ "id": "s1", "url": "https://a.tile.openstreetmap.org/{LOD}/{X}/{Y}.png" }, { "id": "s2", "url": "https://b.tile.openstreetmap.org/{LOD}/{X}/{Y}.png" }, { "id": "s3", "url": "https://c.tile.openstreetmap.org/{LOD}/{X}/{Y}.png" } ] }], "MapLayerStacks": [{ "name": "DEFAULT", "MapLayer": { "name": "layer1", "refMapProvider": "Openstreetmap", "opacity": "1", "colBkgnd": "RGB(255,255,255)" } }] }; window.oGeoMap.setMapConfiguration(window.oMapConfig); window.oGeoMap.setRefMapLayerStack("DEFAULT"); window.oGeoMap.setInitialZoom(8); $.ajax({ url: "https://nominatim.openstreetmap.org/search?format=json&limit=1&q=" + encodeURI(startadress), encoding:"UTF-8", dataType: "json", async: false, success: function(json) { lat = json[0].lat; lon = json[0].lon; } }); window.oGeoMap.setInitialPosition(lon + ";" + lat + ";0"); var dataContext; onChangedWithXML = function (eventObj){ var oModel = new sap.ui.model.json.JSONModel(); var lat_dyn; var lon_dyn; var street = dataContext.read("/BSSP/:STREET", "CANVAS_appData", null); var no = dataContext.read("/BSSP/:HOUSE_NR", "CANVAS_appData", null); var plz = dataContext.read("/BSSP/:PLZ", "CANVAS_appData", null); var ort = dataContext.read("/BSSP/:ORT", "CANVAS_appData", null); if( street != null && ort != null ){ $.ajax({ url: "https://nominatim.openstreetmap.org/search?format=json&limit=1&q=" + encodeURI(street) + "+" + encodeURI(no) + "+" + encodeURI(plz) + "+" + encodeURI(ort), dataType: 'json', async: false, encoding:"UTF-8", success: function(json) { lat_dyn = json[0].lat; lon_dyn = json[0].lon; } }); //Marker setzen var pos_dyn = { Spots : [ { "pos": lon_dyn + ";" + lat_dyn +";0", "tooltip": "Standort" } ] }; oModel.setData(pos_dyn); window.oGeoMap.setModel(oModel); window.oGeoMap.setCenterPosition(lon_dyn + ";" + lat_dyn + ";0"); window.oGeoMap.setZoomlevel(18); } }; //handle the data passed from the content area dataContext = (typeof(window.external) !== "undefined") && (typeof(window.external.DataContext) !== "undefined") ? window.external.DataContext : null; if (dataContext !== null && typeof(dataContext) !=="undefined") { window.external.epcm.subscribeEventReliable("com.sap.lsapi.dataContext", "changedWithXML", undefined, "onChangedWithXML"); }; }, });
So i will try to explain a few points of the controller implementation.
There are three interesting points. First we need to initialize the map and set the tile service from Openstreetmaps. Second we have to convert an adress to longitude and latitude to show on the map. And the NWBC specific point ist to catch the tags passed to the Side Panel.
All of this we do in the onInit function of the controller.
We start to initialize the map and set different parameters. The interesting point is to set the tile service, where the Images for the Map come from(oMapConfig).
The call
$.ajax({ url: "https://nominatim.openstreetmap.org/search?format=json&limit=1&q=" +encodeURI(startadress), encoding:"UTF-8", dataType: "json", async: false, success: function(json) { lat = json[0].lat; lon = json[0].lon; } });
is used to convert an address (city, street + house number or all together) to the needed latitude and longitude. For that procedere we use Nominatim.
The encodeURI you need because of problems from the internet explorer used in the Side Panel to read certain strings correctly. (Occurs only occasionally)
The following snippet is responsible for catching the passed tags.
onChangedWithXML = function (eventObj){ var oModel = new sap.ui.model.json.JSONModel(); var lat_dyn; var lon_dyn; var street = dataContext.read("/BSSP/:STREET", "CANVAS_appData", null); var no = dataContext.read("/BSSP/:HOUSE_NR", "CANVAS_appData", null); var plz = dataContext.read("/BSSP/:PLZ", "CANVAS_appData", null); var ort = dataContext.read("/BSSP/:ORT", "CANVAS_appData", null); if( street != null && ort != null ){ $.ajax({ url: "https://nominatim.openstreetmap.org/search?format=json&limit=1&q=" + encodeURI(street) + "+" + encodeURI(no) + "+" + encodeURI(plz) + "+" + encodeURI(ort), dataType: 'json', async: false, encoding:"UTF-8", success: function(json) { lat_dyn = json[0].lat; lon_dyn = json[0].lon; } }); //Marker setzen var pos_dyn = { Spots : [ { "pos": lon_dyn + ";" + lat_dyn +";0", "tooltip": "Standort" } ] }; oModel.setData(pos_dyn); window.oGeoMap.setModel(oModel); window.oGeoMap.setCenterPosition(lon_dyn + ";" + lat_dyn + ";0"); window.oGeoMap.setZoomlevel(18); } }; //handle the data passed from the content area dataContext = (typeof(window.external) !== "undefined") && (typeof(window.external.DataContext) !== "undefined") ? window.external.DataContext : null; if (dataContext !== null && typeof(dataContext) !=="undefined") { window.external.epcm.subscribeEventReliable("com.sap.lsapi.dataContext", "changedWithXML", undefined, "onChangedWithXML"); };
Every time the DataContext changes(a tag/tags are passed) the event onChangedWithXML is triggered. Within there you could catch the passed tags and work with them in the SAPUI5 Frontend. So we convert the passed adress tags into latitude and longitude and change the position on the map. At the end we add the position to a JSON-model and bind it to the Map, so that the spot could use the data. So the Spot is set correctly.
(Here you must change the names of the tags, if you have uses other names)
3. Bringing the SAPUI5-Application to the SAP-System
Now, after the application is finished, we need to bring it to the SAP-System, so that we can use it in the Side Panel.
Right click on your SAPUI5-Project > Team > Share Project
Then you must choose the SAPUI5 Abap Repository. When you click on Next you have to choose your Connection pass your Login parameters(After the next click on Next).
Then create a new application or choose an existing one:
![]()
If you add it to a packe you have to choose a transport request after you click on Next.
At the end you have to click on Finish.
4. Add the new Maps Side Panel to the BP Transaction in the role maintenance
The last step before we can use the Side Panel is to add it to the suitable transaction. We do that in the role maintenance(PFCG).
![]()
![]()
Now add your SAPUI5-Application (BSP-Application)
![]()
![]()
![]()
In the Application Alias you define, wehere the Side Panel should be shown. (Here the number is the Node ID of Transaction BP)
At the end add the users to the role and save it.
Finish ????
Now open the NWBC again
![]()
Open the link or the transaction BP directly.
(Click on the Side Panel Icon on top right)
![]()
![]()
New NetWeaver Information at SAP.com
Very Helpfull


