
This is Part 3 of this blog post. In Part 1 we explored the standard SideNavigation, created a two level menu via javascript for loops in jsview. And we saw that we can not create more than two levels in standard control. In Part 2 we extended NavigationListItem control and created a four level SideNavigation. And in this final part we will fine tune XNavigationListItem and add some additional functionality to it.
We will continue on the SAPUI5 Application we created in the first two parts. So make sure you create the application or cloned it form GitHub SideNavigationExtend. Let’s continue…
6. Adjust XNavigationListItem
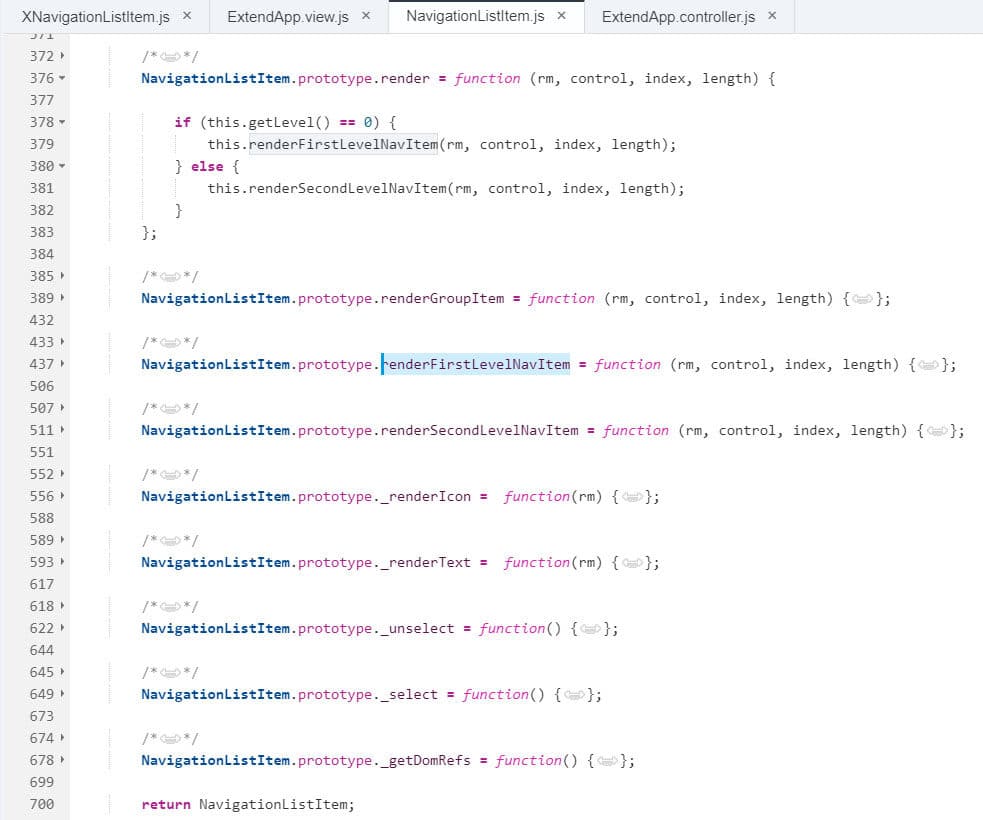
In the standard NavigationListItem, render is done by two main functions: renderFirstLevelNavItem and renderSecondLevelNavItem. And that’s the reason why the standard SideNavigation does not allow more than two levels. (I copied entire control code from GitHub NavigationListItem into a file in Web IDE. You don’t need to, it is not necessary. I did it, just to see the entire code in one place.)
We will extend some functions to make our multi level menu work. First we will begin with getLevel() function. This function gives the level of the current NavigationListItem and in the standard form it only goes one level up. We will extend it to go up to the first level.
Standart getLevel():

Extended getLevel():
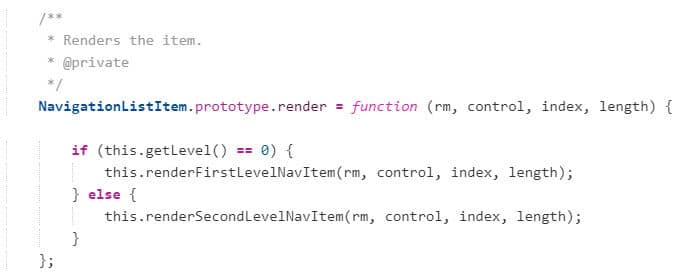
getLevel: function() { var level = 0; var parent = this.getParent(); /* Added while loop instead of if - Musa Arda */ while (parent && parent.getMetadata().getName() == 'sap.demo.controls.XNavigationListItem') { level = level + 1; parent = parent.getParent(); } return level; }, Next, we will extend render() function. In the standard form, this function decides which function to call, according to the level of the current item. And it is either one or two. We will extend this to allow it render any number of levels.
Standard render():
Extended render():
render: function(rm, control, index, length) { /* Call only renderFirstLevelNavItem for all levels - Musa Arda */ this.renderFirstLevelNavItem(rm, control, index, length); /* if (this.getLevel() == 0) { this.renderFirstLevelNavItem(rm, control, index, length); } else { this.renderSecondLevelNavItem(rm, control, index, length); } */ },We only call renderFirstLevelNavItem() function for render. And now we will extend it to render all levels.
Standard renderFirstLevelNavItem():
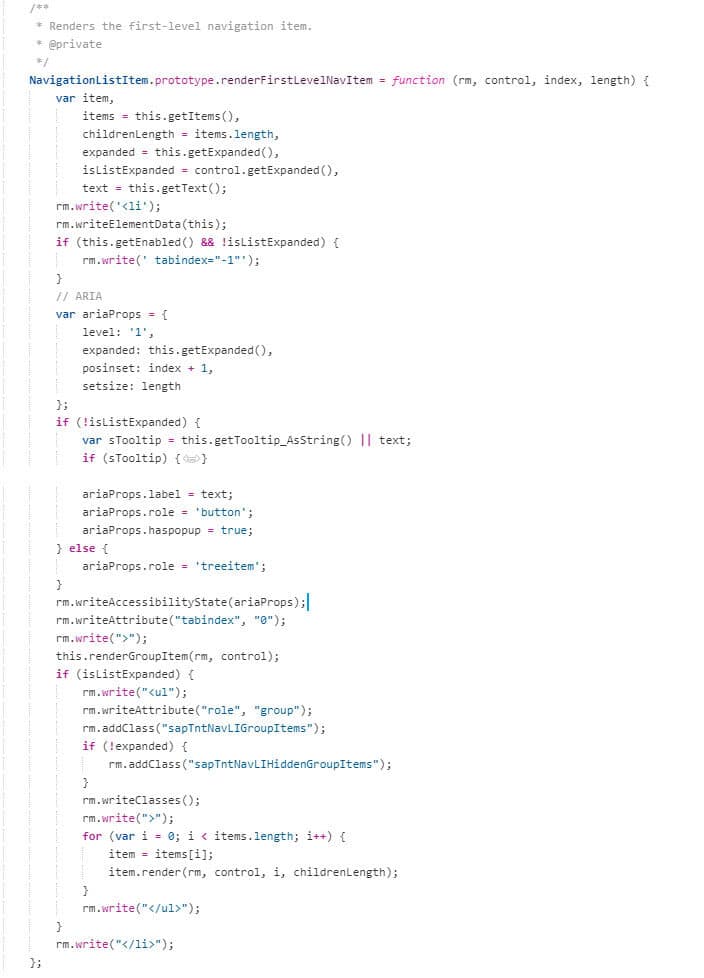
Extended renderFirstLevelNavItem():
renderFirstLevelNavItem: function(rm, control, index, length) { var item, items = this.getItems(), childrenLength = items.length, expanded = this.getExpanded(), isListExpanded = control.getExpanded(), text = this.getText(); rm.write('"); this.renderGroupItem(rm, control); // If has sub items - Musa Arda -> items.length if (isListExpanded && items.length > 0) { rm.write(""); for (var i = 0; i < items.length; i++) { item = items[i]; item.render(rm, control, i, childrenLength); } rm.write("
"); } rm.write(" "); },
7. Fine-tune Look and Feel
At this point, if you run the app, you will see our SideNavigation is multi level, but has some problems in both look and feel and functionality.
First problem is, if you select a parent then all the children get selected too.

We will fix this in _select() function. We will check if the selected item is final level or not. If it is final level, then we will select it, if not we will ignore. (We will add select functionality to the final level only)
Standard _select():
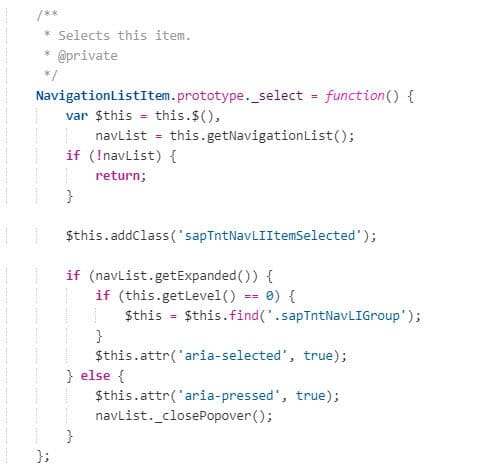
Extended _select():
_select: function() { var $this = this.$(), navList = this.getNavigationList(); if (!navList) { return; } // Removed - Musa Arda //$this.addClass('sapTntNavLIItemSelected'); // Check subItems to add 'sapTntNavLIItemSelected' - Musa Arda var subItems = this.getItems(); if (!(subItems.length > 0)) { $this.addClass('sapTntNavLIItemSelected'); } if (navList.getExpanded()) { if (this.getLevel() == 0) { $this = $this.find('.sapTntNavLIGroup'); } $this.attr('aria-selected', true); } else { $this.attr('aria-pressed', true); navList._closePopover(); } },Now we fixed the select issue, but we have another problem ???? The expand/collapse button doesn’t work properly. We will fix it in expand() and collapse() functions.
Standard expand():

Standard collapse():
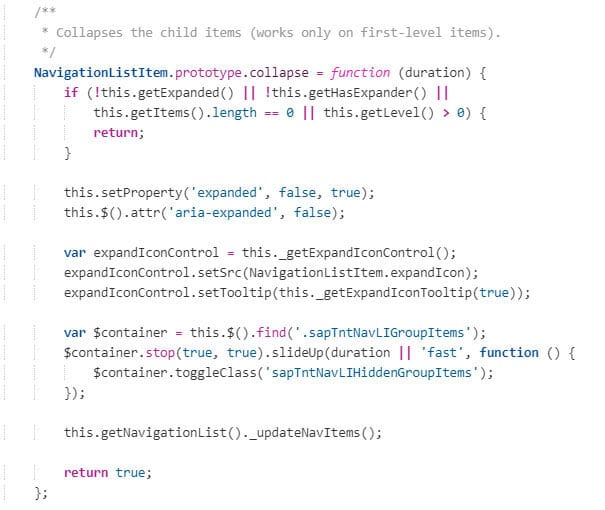
Extended expand():
expand: function(duration) { if (this.getExpanded() || !this.getHasExpander() || this.getItems().length == 0) { return; } this.setProperty('expanded', true, true); this.$().attr('aria-expanded', true); var expandIconControl = this._getExpandIconControl(); expandIconControl.setSrc(NavigationListItem.collapseIcon); expandIconControl.setTooltip(this._getExpandIconTooltip(false)); /* Replaced this with below code - Musa Arda var $container = this.$().find('.sapTntNavLIGroupItems'); $container.stop(true, true).slideDown(duration || 'fast', function() { $container.toggleClass('sapTntNavLIHiddenGroupItems'); }); */ /* Check Sub Items - Musa Arda */ var $firstULContainer = this.$().children('ul').first(); $firstULContainer.toggleClass("sapTntNavLIHiddenGroupItems"); this.getNavigationList()._updateNavItems(); return true; },Extended collapse():
collapse: function(duration) { if (!this.getExpanded() || !this.getHasExpander() || this.getItems().length == 0) { return; } this.setProperty('expanded', false, true); this.$().attr('aria-expanded', false); var expandIconControl = this._getExpandIconControl(); expandIconControl.setSrc(NavigationListItem.expandIcon); expandIconControl.setTooltip(this._getExpandIconTooltip(true)); /* Replaced this with below code - Musa Arda var $container = this.$().find('.sapTntNavLIGroupItems'); $container.stop(true, true).slideUp(duration || 'fast', function() { $container.toggleClass('sapTntNavLIHiddenGroupItems'); }); */ /* Check Sub Items - Musa Arda */ var $firstULContainer = this.$().children('ul').first(); $firstULContainer.toggleClass("sapTntNavLIHiddenGroupItems"); this.getNavigationList()._updateNavItems(); return true; },Now we have to extend ontap() event handler. This function handles tap event and calls expand() and collapse() functions.
Standard ontap():

Extended ontap():
ontap: function(event) { if (event.isMarked('subItem') || !this.getEnabled()) { return; } event.setMarked('subItem'); event.preventDefault(); var navList = this.getNavigationList(); var source = sap.ui.getCore().byId(event.target.id); var level = this.getLevel(); /* Removed - Musa Arda // second navigation level if (level == 1) { var parent = this.getParent(); if (this.getEnabled() && parent.getEnabled()) { this._selectItem(event); } return; } */ // All navigation levels - Musa Arda if (navList.getExpanded() || this.getItems().length == 0) { if (!source || source.getMetadata().getName() != 'sap.ui.core.Icon' || !source.$().hasClass('sapTntNavLIExpandIcon')) { this._selectItem(event); return; } if (this.getExpanded()) { this.collapse(); } else { this.expand(); } } else { var list = this.createPopupList(); navList._openPopover(this, list); } },Now, all the expand and collapse buttons works fine. Here is the current form of our SideNavigation:

Now we will indent the child items, to make our Sidenavigation look like a cascading menu. We will extend renderGroupItem() function.
Standard renderGroupItem():
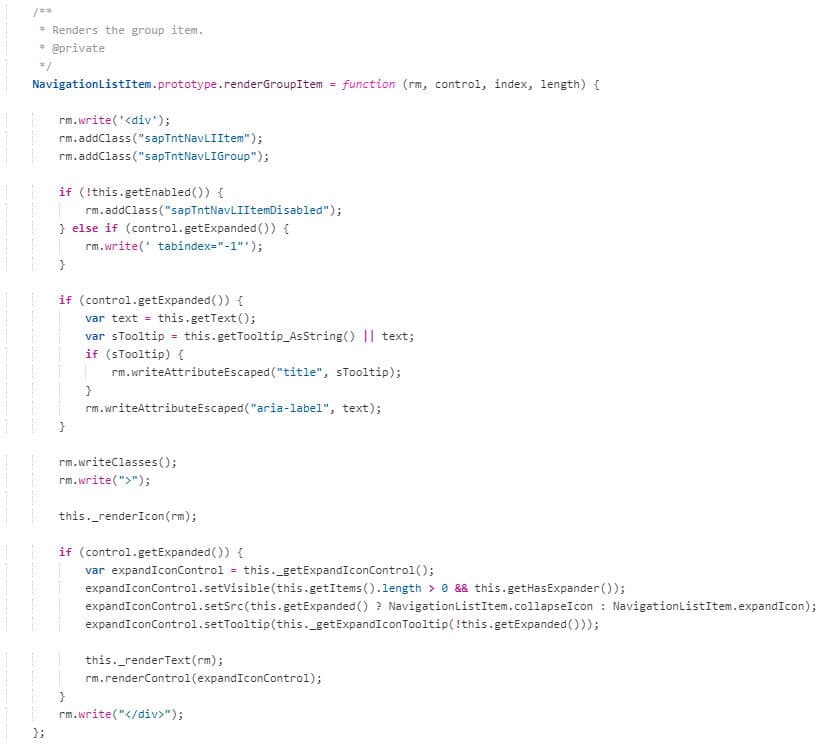
Extended renderGroupItem():
renderGroupItem: function(rm, control, index, length) { rm.write('"); this._renderIcon(rm); if (control.getExpanded()) { var expandIconControl = this._getExpandIconControl(); expandIconControl.setVisible(this.getItems().length > 0 && this.getHasExpander()); expandIconControl.setSrc(this.getExpanded() ? NavigationListItem.collapseIcon : NavigationListItem.expandIcon); expandIconControl.setTooltip(this._getExpandIconTooltip(!this.getExpanded())); this._renderText(rm); rm.renderControl(expandIconControl); } rm.write(""); },An now, we have a nice left-padding in our menu items.

8. Adjust Button Tap Event for Final Level
As a final touch, we will add a MessageToast event to the final level. In the ontap() event handler, add the following code in the area shown below:
if (this.getItems().length == 0) { MessageToast.show(this.getText()); }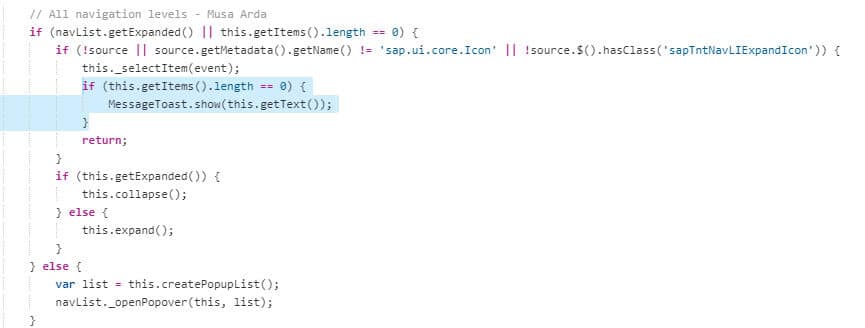
With this code, when you click on the final level items, a message toast will appear and show you the item text.
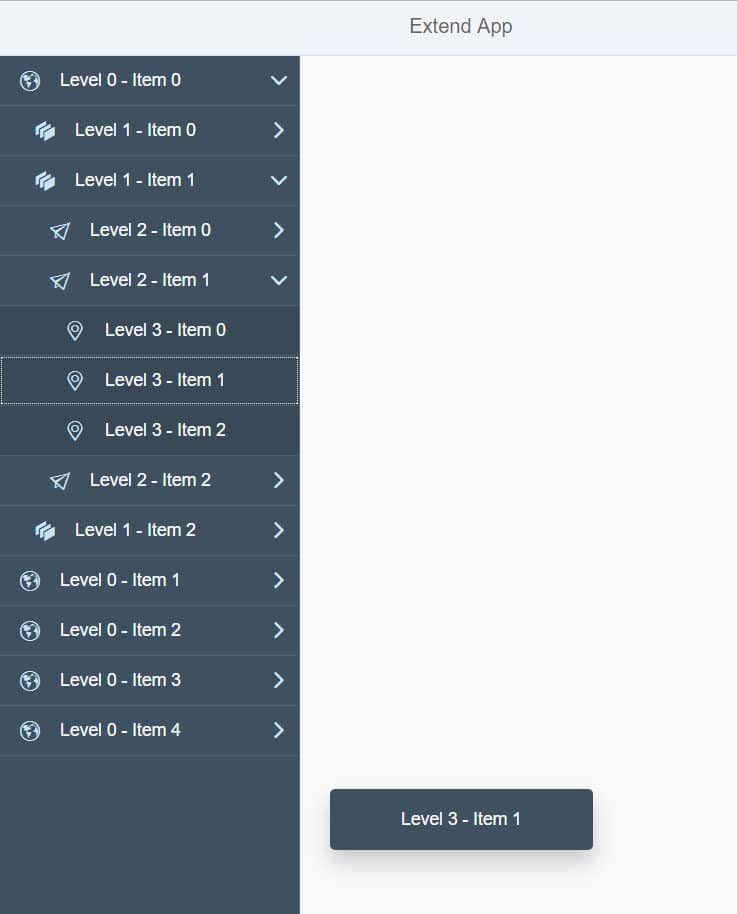
So far we did a huge work. We extended NavigationListItem control and now we have multi level SideNavigation ????
I hope you enjoyed this tutorial and it can help you in your projects. If you have any questions or comments, please do not hesitate to write.
You can clone the entire project from GitHub SideNavigationExtend .
Previous: Part 1, Part 2
New NetWeaver Information at SAP.com
Very Helpfull