
This is Part 2 of this blog post. In Part 1 we explored the standard SideNavigation, create a two level menu via javascript for loops in jsview. And we saw that we can not create more than two levels in standard control. So in this part we will extend NavigationListItem and create a multi level SideNavigation menu.
We will continue on the SAPUI5 Application we created in the first part. So make sure you create the application or cloned it form GitHub SideNavigationExtend. Let’s continue…
5. Extend NavigationListItem Control
To extend NavigationListItem we have to get its source code first. You can see all the SAPUI5 SDK libraries and source codes in the this link: OpenUI5 Git Repository
Here navigate to /master/src/sap.tnt/src/sap/tnt to locate the NavigationListItem.js file.
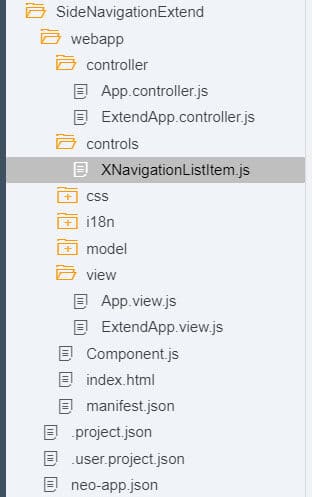
In our application’s “controls” folder create a new file as “XNavigationListItem.js”. We will begin with copying the Modules and the metadata from SDK. In the metadata section we will add an aggregation to itself and define this aggregation as defaultAggregation. This is our XNavigationListItem.js file at the beginning:
// Provides control sap.demo.controls.XNavigationListItem. sap.ui.define(["jquery.sap.global", "sap/ui/core/Item", 'sap/ui/core/Icon', 'sap/tnt/NavigationList', 'sap/ui/core/Renderer', 'sap/ui/core/IconPool', 'sap/tnt/NavigationListItem', "sap/m/MessageToast" ], function(jQuery, Item, Icon, NavigationList, Renderer, IconPool, NavigationListItem, MessageToast) { "use strict"; var XNavigationListItem = NavigationListItem.extend("sap.demo.controls.XNavigationListItem", /** @lends sap.tnt.NavigationListItem.prototype */ { metadata: { defaultAggregation: "xitems", aggregations: { xitems: { type: "sap.demo.controls.XNavigationListItem", multiple: true, singularName: "item" } } }, }); return XNavigationListItem; });Now we have defined our extension structure for XNavigationListItem. The next thing we will do is to use this control in a jsview to see if it works.
In the “view” folder, copy the App.view.js file and paste it as “ExtendApp.view.js”. (We will keep the standard file for comparison). Open “ExtendApp.view.js” and change the “sap.demo.view.App” to “sap.demo.view.ExtendApp”. And change the controller name from “sap.demo.controller.App” to “sap.demo.controller.ExtendApp”. Change the oPage “title” attribute from “{i18n>title}” to simply “Extend App”.
Copy the “App.controller.js” file in the “controller” folder and paste it in the same folder as “ExtendApp.controller.js”. Open this new file and change “sap.demo.controller.App” path to “sap.demo.controller.ExtendApp”.
Since we will move on with the new view as starting view, let’s change the rootview of our application. Open manifest.json file and in “sap.ui5” section, change viewName property as follows:
"rootView": { "viewName": "sap.demo.view.ExtendApp", "type": "JS" },Now save all your changes and run the application to see if everything works fine. (You may need to clear your browser cache.). You should see “Extend App” in the page title.

Now we will change the NavigationListItem controls in our ExtendApp view with our extended control, XNavigationListItem. Our ExtendApp.view.js file will look like this:
sap.ui.jsview("sap.demo.view.ExtendApp", { getControllerName: function() { return "sap.demo.controller.ExtendApp"; }, createContent: function(oController) { /* SideNavigation */ var oSideNavigation = new sap.tnt.SideNavigation("sideNavigation"); /* NavigationList */ var oNavigationList = new sap.tnt.NavigationList("oNavigationList"); /* NavigationListItem Level 0 */ for (var i = 0; i <= 4; i++) { var oNavigationListItem = new sap.demo.controls.XNavigationListItem("", { text: "Level 0 - Item " + i, icon: "sap-icon://globe", expanded: true }); /* NavigationListItem Level 1 */ for (var j = 0; j <= 2; j++) { var oNavigationListItemSub = new sap.demo.controls.XNavigationListItem("", { text: "Level 1 - Item " + j, icon: "sap-icon://dimension", expanded: true }); /* NavigationListItem Level 2 */ for (var k = 0; k <= 2; k++) { var oNavigationListItemSub2 = new sap.demo.controls.XNavigationListItem("", { text: "Level 2 - Item " + k, icon: "sap-icon://paper-plane", expanded: true }); oNavigationListItemSub.addItem(oNavigationListItemSub2); } oNavigationListItem.addItem(oNavigationListItemSub); } oNavigationList.addItem(oNavigationListItem); } oSideNavigation.setItem(oNavigationList); oSideNavigation.addStyleClass("fullHeight"); var oPage = new sap.m.Page({ title: "Extend App", content: [ oSideNavigation ] }); var app = new sap.m.App("myApp", { initialPage: "oPage" }); app.addPage(oPage); return app; } });If you run the app, it will give an error because we didn’t tell our index.html file where to find this new control. So in index.html, add following script code in the head section:
Now if you run the app, you will see that our 3 level menu pops up ???? (Level 0 -> Level 1 -> Level 2)
It is a bit messy and doesn’t look like a menu yet, but do not worry, we will fix it.
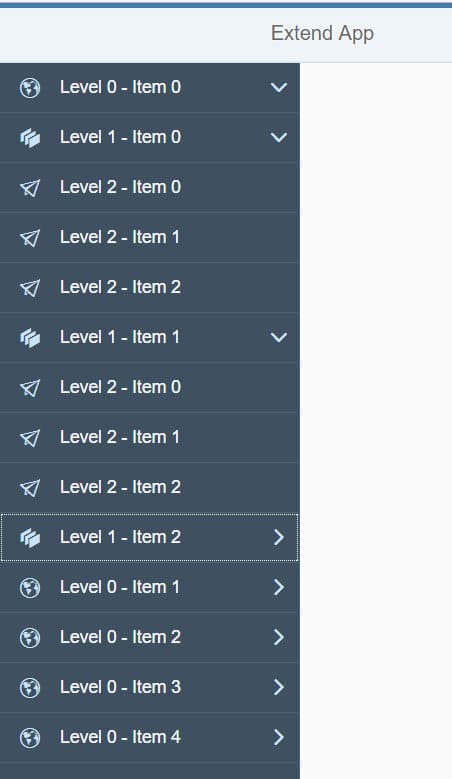
Now let’s add one more level to our menu in order to make it a four level SideNavigation. (Level 3) And change the expanded attributes to false for inner sub-nodes.
sap.ui.jsview("sap.demo.view.ExtendApp", { getControllerName: function() { return "sap.demo.controller.ExtendApp"; }, createContent: function(oController) { /* SideNavigation */ var oSideNavigation = new sap.tnt.SideNavigation("sideNavigation"); /* NavigationList */ var oNavigationList = new sap.tnt.NavigationList("oNavigationList"); /* NavigationListItem Level 0 */ for (var i = 0; i <= 4; i++) { var oNavigationListItem = new sap.demo.controls.XNavigationListItem("", { text: "Level 0 - Item " + i, icon: "sap-icon://globe", expanded: true }); /* NavigationListItem Level 1 */ for (var j = 0; j <= 2; j++) { var oNavigationListItemSub = new sap.demo.controls.XNavigationListItem("", { text: "Level 1 - Item " + j, icon: "sap-icon://dimension", expanded: false }); /* NavigationListItem Level 2 */ for (var k = 0; k <= 2; k++) { var oNavigationListItemSub2 = new sap.demo.controls.XNavigationListItem("", { text: "Level 2 - Item " + k, icon: "sap-icon://paper-plane", expanded: false }); /* NavigationListItem Level 3 */ for (var l = 0; l <= 2; l++) { var oNavigationListItemSub3 = new sap.demo.controls.XNavigationListItem("", { text: "Level 3 - Item " + l, icon: "sap-icon://map", expanded: false }); oNavigationListItemSub2.addItem(oNavigationListItemSub3); } oNavigationListItemSub.addItem(oNavigationListItemSub2); } oNavigationListItem.addItem(oNavigationListItemSub); } oNavigationList.addItem(oNavigationListItem); } oSideNavigation.setItem(oNavigationList); oSideNavigation.addStyleClass("fullHeight"); var oPage = new sap.m.Page({ title: "Extend App", content: [ oSideNavigation ] }); var app = new sap.m.App("myApp", { initialPage: "oPage" }); app.addPage(oPage); return app; } });The result is a four level SideNavigation as follows: (Level 0-1-2-3)

Our brand new SideNavigation is multi level now, but has some defects. Expend/collapse button doesn’t work correctly, there is no indentation in sub-nodes.
All these issues are related to the renderer and other functions of NavigationListItem.
So let’s fix these issues and add some additional functionality to our extended control in the next part.
Next: Part 3
New NetWeaver Information at SAP.com
Very Helpfull