
Hello,
EasyInput is a simple tool allowing non-IT people to create Excel workbooks for data migration to an SAP system. Gathering migration data, testing data correctness and migrating it directly from an Excel workbook with EasyInput becomes easy. This is a tool created by Business Consulting Center (an SAP Partner) and can be freely used for half a year (two trial periods), which is usually enough time for small migration project.
In this blog I will show how to prepare quickly (several minutes) a tool for migrating Cost Center master data from an Excel file to an SAP system. Of course the same procedure can be used for more complex master/ transaction data migrations. This example uses Batch Input technique for KS01 transaction, but note, that the tool is also capable of using eCAT, remote function calls/ BAPIs and SAP GUI scripting.
1. Prerequisites
- You should have Excel 2007-2016 and SAP GUI 7.30 or newer already installed on your workstation. Windows system – Vista or newer.
- Download the EasyInput tool from the EasyInput product site:
https://easyinput.net/trialdownload.html - Unpack it and then install by running /User/setup.exe (you will need administrator authorizations on your computer)
- The tool is ready to be used, but it may require additional authorizations on the SAP system side and port 33XX (XX is SAP system instance number) open between the user’s workstation and the SAP application server. The description of the needed authorizations can be found in a PDF file bundled with installation package. It is however probable that on test/ sandbox SAP systems the user will already have the required authorizations. One can start testing EasyInput on those systems.
2. Preparing quickly an EasyInput Workbook for data migration
- Please start EasyInput either by clicking the Icon on the user’s desktop or by running MS Excel, going to EasyInput ribbon Tab and pressing the Start button (EasyInput is by default not started so it will not slow down excel when you are not using EI).
- On the EasyInput ribbon please press the New EI Workbook ribbon button.

- A new empty EasyInput workbook should appear with five worksheets. One should fill them with settings from the left to the right. The worksheets meaning is shortly described in the table below:
![]()
- Filling in the connection parameters to connect EasyInput workbook with an SAP system. The connection parameters are filled in on the EI_Logon worksheet. It is important to establish connection to the SAP system before continuing with EasyInput workbook configuration.
The information entered on this screen are divided into 4 sections:

Usually one has to provide USER in the first section and fill the data in one of the sections 2, 3 or 4.
![]()
When everything is done one should check whether the connection really works by pressing the Check connection ribbon button.

If everything is OK, after entering the password, one should see the message box with the message “Connection successful!”. If you receive other message please double-check the connection parameters and check whether the prerequisites are met. If nothing helps you can contact EasyInput support at [email protected] . - Configuring the script that will migrate data from MS Excel workbook into the SAP system. In this example we will show how to prepare a simple script for Cost Center master data migration. The same approach can be used for other both master data/ transactional data migration. More complex examples will be given in next blogs and can be also found on our video tutorial webpage: https://easyinput.net/forumnew/viewtopic.php?f=2&t=2
- General script configuration.
To start with the configuration on EI_ScriptName worksheet one has to choose the scriptname, script ID and script type. One script usually contains one transaction/ function call but chaining several transactions / function calls is also possible.
For this example we will use transaction script (recording SAP transaction with batch input/ CAT technique), therefore we will put the data visible on the figure below in the EI_ScriptName worksheet:
![]()
- Detailed script configuration – Recording script
Now the most important of migration configuration begins. We have to record SAP transaction KS01 (Cost Center Create). To do so, we move to EI_Script_TR worksheet and we will start the recording by pressing the ribbon Record script button:
 Now on the small popup one should give the ID of the recorded transaction and select whether the recording will be performed in classic (batch input) way, or with ecat functionality (requires more authorizations and where possible it is better to use classic batch input mode). Here one should enter:
![]()
After password entry box SAP GUI screen should appear. Lets create an example cost center here. Please be sure to enter data in all fields that one wants to be recorded (even it they have default values). It is also recommended to press ENTER before saving master data. This will force data check before saving and will be useful in test mode… For now just enter data on the initial screen of Cost Center creation:

Pressing enter will move to the Cost Center master data detail screen. Here one should fill all the necessary data and press Enter to force data check:
![]()
To end the recording one should press the SAVE button (Ctrl+S). Then one should just confirm importing the recording. The script is in 80% ready. If one has an error during recording, they should just finish the recording pressing Cancel (F12) button and reject the import. Than one should start the recording from the scratch. Anyway, let us assume, the recording is OK, and we have imported the generated script:

Although at first, the recording may seem unreadable, one can easily see three sections (called screens). The first (lines 8-14) is the initial screen. Then the detail screen follows (lines 15-29) and at the end the detail screen is repeated once more (lines 30-44), this time with different BDC_OKCODE (Save =BU instead of Enter /00). For the script to be perfect we will have to rerecord the third screen once more for test run. When recording for the test run, at the end we press Cancel instead of Save. But this we will do later let us assign the script row to data worksheet columns now. - Detailed script configuration – Assigning script lines to data worksheet.
Even though one does not understand the script it is quite easy to find lines corresponding to data entry in the script. In the column K of the Excel one will find a description there. Take into consideration that the rows marked as “CUR:” depict cursor positioning and are usually irrelevant for us. We will have to assign script lines to columns of the data worksheet EI_Data. Lets start from screen one of cost center creation. Here we should assign Controlling Area, Cost Center, Valid-From Date, Valid To Date to EI_Data worksheet columns. On the EI_Data worksheet the columns to put there the data start from AA (the place before is reserved for other purposes). We will write the data from Excel to SAP. Thus the assignment is simply done like that:
![]()
Than we will do the same for the second screen (detail screen with enter pressing). Note that not all the data columns must be assigned. If one wants to create only Cost Centers with currency EUR as in the recording, the row (28) can be left unassigned:

- Detailed script configuration – Removing unnecessary lines and making distinction between test and actual script lines.
The third screen (lines 33-44) is more complex for two reasons. Firstly, it repeats the data from the second screen – this in unnecessary – thus rows (33-44) should be removed or inactivated. Secondly, the last screen should be different for the trial run (per default all the script lines imported are assigned to both test and actual runs in the column B).
One should inactivate unnecessary script lines (by putting “X” in the E column) or just remove them. Normally it is recommended to inactivate them just in case one changes his mind afterwards, but to make it simpler I will remove the unnecessary script rows. Additionally I will change the assignment to Run Type in column B, for the last screen, so that the rows were used only for the actual run:![]()
- Detailed script configuration – Recording test run.
Important. Although it would be possible to have totally different recording for the actual and test runs it is not recommended. It would made script maintenance more complex and finding errors in script would be more tedious. It is better to reuse the part of the script that is common, and usually only few ending script lines will be different. Since the test run should be similar, but the ending we will rerecord the transaction the same way, with the only one difference of pressing the Cancel button instead of Save at the end. Then, we will import this second recording, remove the unnecessary lines that are the same (first two screens) and use only the ending of the second recording:

Note, that after pressing Cancel, a small window asking whether really to cancel appears. Thus in the test run we have two ending screens instead of one for actual run. The script is ready. Just press “Script pre-check” button to check for any errors. If everything is OK, then we can go further and automatically create data sheet descriptions and technical references. If there are any errors one should thoroughly check the invalid script row. - Creating data sheet descriptions and technical references.
By pressing the “Create references in data sheet columns” ribbon button one starts automatic creation of data sheet column descriptions:
![]()
Leave the default values on the appearing popup and press OK. If required enter the password to the SAP system. After a while EI_Data worksheet should activate with the column names (and technical fields in rows 1-3) filled in automatically:

We will switch for a moment to the configuration worksheet EI_Config. - Setting the name of the EasyInput workbook on the EI_Config worksheet.
Although there are many settings that can be changed by the user on the EI_Config worksheet, in our simple example we will change only one. The EasyInputName in row 21 needs to be adjusted. Let us give the workbook the name “Cost Center Create”.
![]()
Now the workbook is really ready to be used for data migration. We can hide the configuration worksheets by pressing the “Show/hide configuration” button on the ribbon menu. Then we should move to the EI_Data worksheet to enter some data records we want to migrate. - Testing the newly created data migration tool.
On the EI_Data worksheet one should enter data for any number of Cost Centers to be created in the SAP system. One should be able to use F4 key to call for SAP standard search Help window. Then the columns A-H should be shown by pressing the small + icon above the H column. These columns will contain messages from the data migration process. The screen should similar to this presented below:

The right “Script name” and “Run type” are already selected. To check if the data are technically correct (data type and length) press “Data pre-check” ribbon button. If everything seems to be OK then press the “Process EasyInput script” button. After processing messages in the cell B5 and in column B below will appear:
![]()
I was lucky to have all the data correct. But if an error appears it may mean either, that the script was recorded/ adjusted incorrectly or that the data entered on the EI_Data worksheet is incorrect. After checking both reasons (should be explained in column D), one can re-run the processing of the EasyInput script in the test mode. If all the data is processed OK in the test run, one can switch to actual run for new records (“AN – Actual Run on New”). When after this run all the messages in the column E are “OK” then the new Cost Centers have been created in the SAP System.
EasyInput workbook for Cost Center mass creation is ready. It can be saved and shared with other people within the organization. In my next blogs I will present more complex scenarios. For the time being I encourage you to visit the https://easyinput.netwebpage and especially the page with video tutorials: https://easyinput.net/forumnew/viewtopic.php?f=2&t=2Have fun and do not hesitate to ask me questions,
Chris Siwiec
P.S.: EasyInput installation files contain many examples including Cost Center creation, posting FI documents larger than 999 lines, creating and changing BOMs, creating purchase requests and many many others.


 Now on the small popup one should give the ID of the recorded transaction and select whether the recording will be performed in classic (batch input) way, or with ecat functionality (requires more authorizations and where possible it is better to use classic batch input mode). Here one should enter:
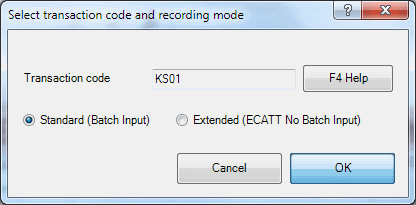


 EasyInput workbook for Cost Center mass creation is ready. It can be saved and shared with other people within the organization. In my next blogs I will present more complex scenarios. For the time being I encourage you to visit the
 New NetWeaver Information at SAP.com
Very Helpfull